File Upload File Type Restriction in Vue
What's dissimilar about the file uploader we're building in this commodity versus the previous one? The previous drag-and-drop file uploader was congenital with Vanilla JS and really focused on how to make file uploading and drag-and-drop file pick work, so its feature set was limited. Information technology uploaded the files immediately after you chose them with a unproblematic progress bar and an image thumbnail preview. You tin see all of this at this demo.
In addition to using Vue, we'll be changing the features up: later an epitome is added, it will not upload immediately. Instead, a thumbnail preview volition bear witness up. At that place will be a push button on the top right of the thumbnail that volition remove the file from the list in case you lot didn't hateful to select an image or change your mind about uploading it.
You'll then click on the "Upload" button to send the image data to the server and each prototype will display its upload status. To top it all off, I crafted some snazzy styles (I'one thousand no designer, though, then don't approximate too harshly). Nosotros won't be excavation into those styles in this tutorial, but they'll be bachelor for yous to copy or sift through yourself in the GitHub Repository — though, if you're going to copy them, make sure yous ready your projection to be able to use Stylus styles (or you can set it upwards to use Sass and alter lang to scss for the style blocks and information technology will work that fashion). You lot can also see what we're building today on the demo folio.
Notation: I will assume that readers have strong JavaScript knowledge and a good grasp of the Vue features and APIs, particularly Vue three's composition API, but not necessarily the best ways to use them. This article is to acquire how to create a drag-and-drop uploader in the context of a Vue app while discussing good patterns and practices and volition not go deep into how to use Vue itself.
Setup
There are a lot of ways to prepare upwards a Vue project: Vue CLI, Vite, Nuxt, and Quasar all have their own project scaffolding tools, and I'm sure there are more. I'1000 not all that familiar with well-nigh of them, and I'yard not going to prescribe any i tool as of right for this project, and so I recommend reading the documentation for whichever y'all cull to figure out how to fix the style we demand it for this little project.
We need to be set upward with Vue three with the script setup syntax, and if y'all're snatching my styles from the Github repo, you'll demand to make sure you lot're set upwards to have your Vue styles compiled from Stylus (or you can set information technology up to use Sass and change lang to "scss" for the style blocks and information technology will work that mode).
Drop Zone
Now that we have the projection ready, let'southward swoop into the code. We'll start with a component that handles the drag-and-drop functionality. This volition exist a unproblematic wrapper div chemical element with a agglomeration of result listeners and emitters for the about part. This sort of element is a great candidate for a reusable component (despite it only existence used once in this detail project): it has a very specific job to exercise and that job is generic enough to be used in a lot of different ways/places without the need of a ton of customization options or complexity.
This is 1 of those things skilful developers are always keeping an middle out for. Cramming a ton of functionality into a single component would be a bad idea for this project or whatever other because then 1) information technology tin can't exist reused if you notice a like situation later and 2) it'due south more difficult to sort through the code and effigy out how each slice relates to each other. So, we're going to do what we can to follow this principle and information technology starts here with the DropZone component. We'll first with a elementary version of the component and then spruce it upward a chip to assist you grok what'due south going on a fleck easier, so let's create a DropZone.vue file in the src/components folder:
<template> <div @drop.prevent="onDrop"> <slot></slot> </div> </template> <script setup> import { onMounted, onUnmounted } from 'vue' const emit = defineEmits(['files-dropped']) function onDrop(e) { emit('files-dropped', [...e.dataTransfer.files]) } office preventDefaults(e) { e.preventDefault() } const events = ['dragenter', 'dragover', 'dragleave', 'drop'] onMounted(() => { events.forEach((eventName) => { document.torso.addEventListener(eventName, preventDefaults) }) }) onUnmounted(() => { events.forEach((eventName) => { document.body.removeEventListener(eventName, preventDefaults) }) }) </script> Starting time, looking at the template, y'all'll run into a div with a driblet event handler (with a foreclose modifier to prevent default deportment) calling a role that we'll get to in a moment. Inside that div is a slot, and so we can reuse this component with custom content inside information technology. Then we get to the JavaScript code, which is inside a script tag with the setup attribute.
Notation: If you're unfamiliar with what benefits nosotros get from this attribute and you didn't read the link we added above, caput over to the <script setup> documentation for single file components.
Inside the script, we define an event that we'll emit chosen 'files-dropped' that other components can use to practise something with the files that get dropped here. Then we define the function onDrop to handle the drop issue. Right at present, all it does is emit the event nosotros only defined and add an array of the files that were only dropped every bit the payload. Note, we're using a trick with the spread operator to convert the list of files from the FileList that e.dataTransfer.files gives united states of america to an assortment of Filedue south and so all the array methods can exist called on it by the part of the system that takes the files.
Finally, we come to the identify where we handle the other drag/drop events that happen on the body, preventing the default behavior during the drag and drop (namely that information technology'll open one of the files in the browser. We create a role that simply calls preventDefault on the event object. And so, in the onMounted lifecycle hook we iterate over the list of events and forestall default behavior for that fifty-fifty on the document body. In the onUnmounted claw, we remove those listeners.
More after jump! Continue reading beneath ↓
Agile Land
So, what extra functionality can we add together? The one thing I decided to add was some state indicating whether the drop zone was "agile", meaning that a file is currently hovering over the drop zone. That'due south uncomplicated plenty; create a ref called active, set it to true on the events when the files are dragged over the driblet zone and false when they leave the zone or are dropped.
We'll also desire to expose this land to the components using DropZone, so nosotros'll plow our slot into a scoped slot and betrayal that state there. Instead of the scoped slot (or in addition to it for added flexibility), we could emit an upshot to inform the outside of the value of agile as it changes. The advantage of this is that the unabridged component that is using DropZone tin accept access to the land, rather than it being limited to the components/elements within the slot in the template. We're going to stick with the scoped slot for this commodity though.
Finally, for good measure, nosotros'll add a data-active attribute that reflects agile's value so nosotros tin key off information technology for styling. You could as well utilise a grade if you prefer, but I tend to like data attributes for country modifiers.
Let'southward write it out:
<template> <!-- add `information-active` and the event listeners --> <div :information-active="agile" @dragenter.prevent="setActive" @dragover.prevent="setActive" @dragleave.prevent="setInactive" @drop.prevent="onDrop"> <!-- share land with the scoped slot --> <slot :dropZoneActive="active"></slot> </div> </template> <script setup> // make sure to import `ref` from Vue import { ref, onMounted, onUnmounted } from 'vue' const emit = defineEmits(['files-dropped']) // Create `active` state and manage information technology with functions let agile = ref(faux) function setActive() { active.value = truthful } office setInactive() { active.value = false } part onDrop(eastward) { setInactive() // add this line too emit('files-dropped', [...e.dataTransfer.files]) } // ... zippo changed beneath this </script> I threw some comments in the code to note where the changes were, so I won't dive also deep into it, but I have some notes. We're using the prevent modifiers on all the upshot listeners again to brand sure that default behavior doesn't activate. Likewise, you'll find that the setActive and setInactive functions seem like a bit of overkill since you could just set agile directly, and yous could brand that argument for sure, only just wait a scrap; there will be another modify that truly justifies the creation of functions.
You run into, there'south an result with what nosotros've done. Equally you can see in the video below, using this lawmaking for the drop zone means that it can flicker between active and inactive states while you elevate something effectually inside the drop zone.
Why is information technology doing that? When you drag something over a child chemical element, it will "enter" that element and "leave" the drop zone, which causes it to go inactive. The dragenter event will chimera up to the drop zone, but information technology happens earlier the dragleave upshot, then that doesn't help. Then a dragover event will fire again on the drop zone which volition flip it back to active but not before flickering to the inactive land.
To fix this, we'll add a short timeout to the setInactive office to prevent it from going inactive immediately. And then setActive will articulate that timeout so that if information technology is called before we actually set up it equally inactive, it won't really get inactive. Let's make those changes:
// Nothing changed above let active = ref(false) permit inActiveTimeout = nothing // add a variable to agree the timeout key function setActive() { active.value = true clearTimeout(inActiveTimeout) // clear the timeout } function setInactive() { // wrap it in a `setTimeout` inActiveTimeout = setTimeout(() => { active.value = faux }, 50) } // Nothing below this changes You'll annotation a timeout of 50 milliseconds. Why this number? Because I've tested several different timeouts and this feels the best.
I know that'southward subjective simply hear me out. I've tested much smaller timeouts and 15ms was about equally low as I went where I never saw a flicker, merely who knows how that'll work on other hardware? It has as well small a margin of error in my mind. You also probably don't want to go over 100ms because that can cause perceived lag when a user intentionally does something that should cause information technology to go inactive. In the end, I settled somewhere in the middle that is long enough to pretty much guarantee at that place won't be any flickering on whatsoever hardware and there should be no perceived lag.
That's all we need for the DropZone component, then let'due south movement on to the next slice of the puzzle: a file list managing director.
File List Manager
I guess the first thing that needs to exist done is an explanation of what I hateful by the file list manager. This will be a composition function that returns several methods for managing the state of the files the user is attempting to upload. This could besides exist implemented as a Vuex/Pinia/alternative store equally well, but to go on things simple and preclude needing to install a dependency if we don't need to, it makes a lot of sense to keep it equally a composition function, especially since the data isn't likely to be needed widely beyond the awarding, which is where the stores are the most useful.
You could also just build the functionality directly into the component that volition be using our DropZone component, but this functionality seems like something that could very easily be reused; pulling it out of the component makes the component easier to understand the intent of what is going on (assuming good part and variable names) without needing to wade through the unabridged implementation.
Now that nosotros've made it clear this is going to be a limerick function and why, hither's what the file listing manager will do:
- Keep a list of files that accept been selected by the user;
- Foreclose indistinguishable files;
- Allow us to remove files from the listing;
- Augment the files with useful metadata: an ID, a URL that tin can exist used to bear witness a preview of the file, and the file's upload status.
So, allow's build information technology in src/compositions/file-list.js:
import { ref } from 'vue' export default function () { const files = ref([]) function addFiles(newFiles) { permit newUploadableFiles = [...newFiles] .map((file) => new UploadableFile(file)) .filter((file) => !fileExists(file.id)) files.value = files.value.concat(newUploadableFiles) } function fileExists(otherId) { return files.value.some(({ id }) => id === otherId) } function removeFile(file) { const alphabetize = files.value.indexOf(file) if (index > -1) files.value.splice(index, 1) } return { files, addFiles, removeFile } } form UploadableFile { constructor(file) { this.file = file this.id = `${file.proper noun}-${file.size}-${file.lastModified}-${file.type}` this.url = URL.createObjectURL(file) this.status = cypher } } We're exporting a part past default that returns the file list (as a ref) and a couple of methods that are used to add together and remove files from the list. It would exist overnice to make the file list returned as read-only to force you to employ the methods for manipulating the listing, which yous can practice pretty easily using the readonly part imported from Vue, but that would crusade issues with the uploader that we'll build later.
Note that files is scoped to the composition role and set inside it, so each time you telephone call the part, you'll receive a new file list. If yous want to share the country across multiple components/calls, then you'll need to pull that declaration out of the role and then information technology's scoped and set one time in the module, but in our case we're just using information technology one time, so it doesn't actually matter, and I was working under the thought that each instance of the file list would be used by a split up uploader and any country tin can be passed down to child components rather than shared via the limerick function.
The most complex piece of this file list manager is calculation new files to the list. Offset, nosotros're making certain that if a FileList object was passed instead of an array of File objects, then we convert information technology to an array (every bit we did in the DropZone when we emitted the files. This means we could probably skip that transformation, simply ameliorate safe than deplorable). And then nosotros convert the file to an UploadableFile, which is a grade we're defining that wraps the file and gives us a few extra properties. We're generating an id based on several aspects of the file and so we can detect duplicates, a blob:// URL of the epitome and then we can show preview thumbnails and a status for tracking uploads.
Now that we take the IDs on the files, we filter out any files that already exist in the file list before concatenating them to the end of the file list.
Possible Improvements
While this file list manager works well for what it does, at that place are a number of upgrades that can be washed. For one thing, instead of wrapping the file in a new class and so having to call .file on it to access the original file object, nosotros could wrap the file in a proxy that specifies our new properties, merely then will forward any other property requests on to the original object, so it is more seamless.
As an alternative to wrapping each file in an UploadableFile, we could have provided utility functions that could return the ID or URL given a file, but that'southward slightly less convenient and would mean that y'all're potentially calculating these properties multiple times (for each render, and then on), but that shouldn't really thing unless you're dealing with people dropping thousands of images at once, in which case you tin can try memorizing it.
As for the condition, that isn't pulled straight from the File, then a simple utility function like the others wouldn't be possible, only you could shop the status of each file with the uploader (we'll be building that afterward) rather than direct with the files. This might exist a better way of handling it in a big app so we don't end up filling the UploadableFile form with a bunch of backdrop that just facilitate a single expanse of the app and are useless elsewhere.
Annotation: For our purposes, having the properties bachelor directly on our file object is past far the about convenient, but information technology can definitely be argued that information technology isn't the most appropriate.
Some other possible comeback is allowing you to specify a filter so that it only allows certain file types to be added to the list. This would also require addFiles to return errors when some files don't match the filter in society to let the user know they made a mistake. This is definitely something that should be done in production-ready applications.
Better Together
We're far from a finished product, simply let's put the pieces we have together to verify everything is working so far. We're going to exist editing the /src/App.vue file, to put these pieces in, but you can add together them to whatever page/section component you desire. If you lot're putting it inside an alternating component, though, ignore anything (like an ID of "app") that would just be seen on the main app component.
<template> <div id="app"> <DropZone class="drop-area" @files-dropped="addFiles" #default="{ dropZoneActive }"> <div v-if="dropZoneActive"> <div>Drop Them</div> </div> <div five-else> <div>Drag Your Files Here</div> </div> </DropZone> </div> </template> <script setup> import useFileList from './compositions/file-listing' import DropZone from './components/DropZone.vue' const { files, addFiles, removeFile } = useFileList() </script> If you start with the script section, you'll see we're not doing a whole lot. We're importing the 2 files nosotros just finished writing and nosotros're initializing the file listing. Note, we're non using files or removeFile nevertheless, simply we will later, so I'yard just keeping them there for now. Sorry if ESLint is complaining about unused variables. We'll want files at the very least so we tin can see if it's working later.
Moving on to the template, you tin see nosotros're using the DropZone component correct away. We're giving it a form so we tin can style it, passing the addFiles role for the "files-dropped" result handler, and grabbing the scoped slot variable so our content can be dynamic based on whether or not the driblet zone is active. And so, inside the drop zone's slot, we create a div showing a bulletin to drag files over if it'south inactive and a message to drop them when it is active.
Now, you'll probably desire some styles to at least make the drop zone larger and easier to notice. I won't be pasting any here, but y'all can find the styles I used for App.vue in the repo.
Now, earlier we tin test the current land of the app, we'll demand the beta version of Vue DevTools installed in our browser (stable version doesn't support Vue iii quite yet). You can get Vue DevTools from Chrome web store for most Chromium-based browsers or download Vue DevTools here for Firefox.
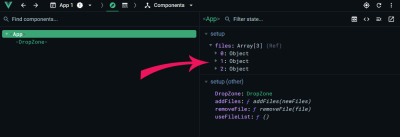
After you've installed that, run your app with npm run serve (Vue CLI), npm run dev (Vite), or whatever script y'all use in your app, so open up it in your browser via the URL given in the command line. Open up up the Vue DevTools, then drag and drop some images onto the drop zone. If it worked, you should encounter an array of nonetheless many files yous added when you lot view the component nosotros but wrote (see screenshot beneath).
Nice! Now Let's make this a scrap more accessible for users who tin't (or don't desire to) elevate and driblet, by calculation a subconscious file input (that becomes visible when focused via keyboard for those that demand it, assuming you're using my styles) and wrapping a big label effectually everything to allow us to apply it despite its invisibility. Finally, we'll demand to add an upshot listener to the file input and so that when a user selects a file, we tin can add it to our file list.
Allow's start with the changes to the script section. We're just going to add a role to the cease of it:
role onInputChange(e) { addFiles(eastward.target.files) e.target.value = null } This role handles the "alter" upshot fired from the input and adds the files from the input to the file list. Annotation the last line in the function resetting the value of the input. If a user adds a file via the input, decides to remove it from our file listing, then changes their mind and decides to use the input to add that file again, then the file input will non fire the "change" event because the file input has non changed. By resetting the value similar this, nosotros ensure the upshot will always exist fired.
Now, let'southward brand our changes to the template. Change all of the code inside the DropZone slot to the post-obit:
<label for="file-input"> <span 5-if="dropZoneActive"> <span>Drop Them Here</span> <span class="smaller">to add them</bridge> </span> <bridge v-else> <bridge>Drag Your Files Here</bridge> <bridge course="smaller"> or <strong><em>click here</em></strong> to select files </bridge> </span> <input blazon="file" id="file-input" multiple @change="onInputChange" /> </characterization> Nosotros wrap the unabridged thing in a label that is linked to the file input, then we add our dynamic messages back in, though I've added a bit more messages to inform users they tin can click to select files. I also added a fleck for the "drop them" message so that they have the same number of lines of text so the drop zone won't change size when active. Finally, we add the file input, fix the multiple attribute to permit users to select multiple files at a time, then wire up the "modify" event listener to the function we just wrote.
Run the app again, if yous stopped it, we should see the aforementioned result in the Vue DevTools whether we drag and drop files or click the box to apply the file selector.
Previewing Selected Images
Great, but users aren't going to exist using Vue DevTools to run into if the files they dropped are actually added, so let'south start showing the users those files. We'll start just past editing App.vue (or whatever component file you added the DropZone to) and showing a elementary text list with the file names.
Let'due south add the following bit of code to the template immediately post-obit the characterization nosotros simply added in the previous stride:
<ul five-show="files.length"> <li v-for="file of files" :cardinal="file.id">{{ file.file.proper noun }}</li> </ul> At present, with the app running, if you lot add together some files to the list, you should meet a bulleted list of the file names. If y'all copied my styles, it might await a chip odd, but that's alright because we're changing it soon. Make note that thanks to calculation the file'southward ID in the file list manager, nosotros now take a key in the loop. The simply thing that annoys me personally is that since we wrapped the files, nosotros demand to write file.file to admission the original file object to become its name. In the end, though, it'south a small sacrifice to make.
At present, let'due south offset showing the images instead of just listing their names, merely it's time to move this functionality out of this main component. We certainly could, keep putting the file preview functionality here, but there are 2 proficient reasons to pull it out:
- The functionality is potentially reusable in other cases.
- As this functionality expands, separating it out prevents the master component from getting besides swollen.
So, permit's create /src/FilePreview.vue to put this functionality in and we'll start with just showing the epitome in a wrapper.
<template> <component :is="tag" class="file-preview"> <img :src="file.url" :alt="file.file.name" :title="file.file.name" /> </component> </template> <script setup> defineProps({ file: { blazon: Object, required: truthful }, tag: { type: String, default: 'li' }, }) </script> Once once again, the styles aren't included here, but you tin notice them on GitHub. Outset thing to note about the code nosotros take, though, is that we're wrapping this in a component tag and setting what type of tag it is with a tag prop. This tin can be a good manner to make a component more than generic and reusable. We're currently using this inside an unordered list, and so li is the obvious option, only if we want to utilise this component somewhere else at some point, it might not be in a list, then nosotros would want a different tag.
For the image, we're using the URL created by the file list manager, and we're using the file name as the alt text and equally the title aspect and then nosotros get that free functionality of users being able to hover over the image and encounter the file name equally a tooltip. Of class, yous tin can always create your own file preview where the file proper noun is written out where it'due south always visible for the user. There's certainly a lot of freedom in how this can be handled.
Moving on to the JavaScript, nosotros see props defined so nosotros can pass in the file that we're previewing and a tag proper noun to customize the wrapper in club to make this usable in more situations.
Of grade, if yous try to run this, it doesn't seem to practice annihilation because we currently aren't using the FilePreview components. Let's remedy that at present. In the template, supplant the current listing with this:
<ul class="paradigm-list" five-testify="files.length"> <FilePreview v-for="file of files" :key="file.id" :file="file" tag="li" /> </ul> Also, nosotros need to import our new component in the script section:
import FilePreview from './components/FilePreview.vue' Now if y'all run this, yous'll meet some nice thumbnails of each image yous drop or select.
Remove Files From the List
Let'southward broaden this with the power to remove a file from the listing. We'll add a button with an "Ten" in the corner of the image that people tin can click/tap on to remove the prototype. To do this, we'll need to add 2 lines of code to FilePreview.vue. In the template, but in a higher place the img tag add the following:
<button @click="$emit('remove', file)" grade="close-icon" aria-label="Remove">×</push button> Then add this line somewhere in the script section:
defineEmits(['remove']) Now, clicking that button will burn a remove event, passing the file forth as the payload. Now nosotros need to head back to the principal app component to handle that event. All nosotros need to do is to add the event listener to the FilePreview tag:
<FilePreview v-for="file of files" :fundamental="file.id" :file="file" tag="li" @remove="removeFile" /> Thanks to removeFile already being divers by the file list manager and taking the same arguments that nosotros're passing from the outcome, nosotros're done in seconds. At present if you run the app and select some images, you can click on the lilliputian "Ten" and the corresponding epitome will disappear from the list.
Possible Improvements
As usual, there are improvements that could be fabricated to this if you lot're then inclined and your awarding is able to reuse this component elsewhere if it is more generic or customizable.
First of all, you could manage the styles better. I know that I didn't post the styles here, but if yous copied them from GitHub and you're a person that cares a lot about which components command which styles, then you lot may be thinking that it'd exist wiser to have some specific files moved out of this component. As with most of these possible improvements, this is mostly to practise with making the component more useful in more situations. Some of the styles are very specific to how I wanted to display the previews for this one little app, just to make it more reusable, we either need to brand styles customizable via props or pull them out and let an outer component define the styles.
Another possible change would be to add props that allow you to hide sure elements such every bit the push button that fires the "remove" result. There are more elements coming later in the article that might be adept to hide via props every bit well.
And finally, it might be wise to dissever the file prop into multiple props such as url, name, and — as we'll see later — status. This would allow this component to be used in situations where you but have an image URL and proper noun rather than an UploadableFile instance, then it's more useful in more than situations.
Uploading Files
Alright, we accept the drag and drib and a preview of the files selected, and so at present we need to upload those files and keep the user informed of the status of those uploads. We'll commencement with creating a new file: /compositions/file-uploader.js. In this file, we'll export some functions that allow our component to upload the files.
export async function uploadFile(file, url) { // ready the request data allow formData = new FormData() formData.append('file', file.file) // runway status and upload file file.status = 'loading' allow response = look fetch(url, { method: 'POST', body: formData }) // alter status to indicate the success of the upload request file.status = response.ok return response } consign role uploadFiles(files, url) { return Promise.all(files.map((file) => uploadFile(file, url))) } export default function createUploader(url) { render { uploadFile: part (file) { return uploadFile(file, url) }, uploadFiles: function (files) { render uploadFiles(files, url) }, } } Before looking into specific functions, annotation that every part in this file is exported separately so it can be used on its own, but you'll meet that we'll only exist using one of them in our awarding. This gives some flexibility in how this module is used without actually making the code whatever more complicated since all nosotros practice is add an consign argument to enable it.
At present, starting at the summit, we take an asynchronous office for uploading a single file. This is constructed in a very like style to how information technology was done in the previous commodity, but we are using an async function instead (for that wonderful look keyword) and we're updating the status property on the provided file to keep rail of the upload's progress. This status can have four possible values:
-
aught: initial value; indicates that information technology has not started uploading; -
"loading": indicates that the upload is in progress; -
true: indicates the upload was successful; -
false: indicates the upload failed.
So, when we start the upload, we marking the condition as "loading". Once information technology's finished, we mark it as truthful or false depending on the result'southward ok property. Shortly nosotros'll be using these values to show different messages in the FilePreview component. Finally, nosotros return the response in case the caller tin can use that information.
Note: Depending on which service yous upload your files to, you may need some boosted headers for authority or something, but you tin get those from the documentation for those services since I can't write an example for every service out there.
The next function, uploadFiles, is there to permit you to hands upload an array of files. The final part, createUploader, is a function that grants you the ability to use the other functions without having to specify the URL that you lot're uploading to every time you call it. It "caches" the URL via a closure and returns versions of each of the two previous functions that don't require the URL parameter to be passed in.
Using the Uploader
Now that we take these functions defined, we demand to use them, so go dorsum to our main app component. Somewhere in the script department, nosotros'll need to add together the following two lines:
import createUploader from './compositions/file-uploader' const { uploadFiles } = createUploader('YOUR URL HERE') Of form, yous'll need to change the URL to match whatever your upload server uses. Now we just need to telephone call uploadFiles from somewhere, so let's add a button that calls it in its click handler. Add together the following at the finish of the template:
<button @click.forestall="uploadFiles(files)" class="upload-button">Upload</push button> There you go. Now if you lot run the app, add some images, and smash that button, they should be headed for the server. But… we can't tell if it worked or not — at to the lowest degree non without checking the server or the network console in the dev tools. Let's fix that.
Showing The Status
Open up FilePreview.vue. In the template after the img tag merely all the same within component, let'due south add the following:
<span class="status-indicator loading-indicator" v-show="file.status == 'loading'">In Progress</span> <span class="condition-indicator success-indicator" v-show="file.status == truthful">Uploaded</span> <span class="status-indicator failure-indicator" v-bear witness="file.status == false">Error</span> All the styles are already included to control how these expect if you copied the styles from GitHub before. These all sit in the bottom right corner of the images displaying the electric current status. Only i of them is shown at a time based on file.status.
I used v-evidence hither, merely it as well makes a lot of sense to utilise v-if, and then you tin use either one. By using v-show, it always has the elements in the DOM but hides them. This means we can inspect the elements and cause them to show up even if they aren't in the correct state, then nosotros tin can examination if they look right without trying to exercise it by putting the app into a certain state. Alternatively, you could go into the Vue DevTools, make sure you're in the "Inspector" screen, click the three dots menu push button in the tiptop right and toggle "Editable props" to true, then edit the props or state in the component(due south) to bring almost the states needed to exam each indicator.
Note: Only be aware that once y'all edit the file state/prop, it is no longer the same object as the one that was passed in, so clicking the button to remove the prototype will not work (can't remove a file that isn't in the array) and clicking "Upload" won't show whatever state changes for that image (because the one in the array that is beingness uploaded isn't the same file object as the one beingness displayed by the preview).
Possible Improvements
As with other parts of this app, there are a few things nosotros could do to brand this better, simply that we won't really be changing. First of all, the status values are pretty cryptic. It would be a skilful idea to implement the values as constants or an enum (TypeScript supports enums). This would ensure that you lot don't misspell a value such as "loading" or endeavor to fix the condition to "error" instead of false and run into a bug. The status could also be implemented as a land machine since there is a very defined gear up of rules for how the land changes.
In addition to improve statuses, there should be meliorate fault handling. Nosotros inform the users that there was an issue with the upload, but they accept no idea what the error is. Is it a trouble with their internet? Was the file also big? Is the server down? Who knows? Users need to know what the problem is then they know what they can do nearly it — if anything.
We could besides keep the users amend apprised of the upload. By using XHR instead of fetch (which I discussed in the previous drag-and-drop uploader article), nosotros can track "progress" events to know the percentage of the upload that was completed, which is very useful for large files and tiresome internet connections considering it tin can testify to the user that progress is actually being made and that it didn't get stuck.
The one change that tin can increase the reusability of the lawmaking is opening upward the file uploader to boosted options (such as asking headers) to be able to be passed in. In addition, we could cheque the status of a file to prevent us from uploading a file that'due south already in progress or is already uploaded. To farther aid with this, nosotros could disable the "Upload" button during the upload, and it should probably also be disabled when there are no files selected.
And final, but virtually certainly not least, we should add some accessibility improvements. In particular, when adding files, removing them, and uploading them (with all those status changes), we should audibly inform screen reader users that things take changed using Live Regions. I'm no expert on this, and they fall a fleck outside the scope of this commodity, so I will not be going into whatever kind of particular, but it'southward definitely something everyone should look into.
Job'due south Done
Well, that'southward it. The Vue Drag-and-Drop Paradigm Uploader is done! Every bit mentioned at the commencement, you can run across the finished product here and look at the final code in the GitHub Repository.
I hope you spend some time trying to implement the possible improvements that I've laid out in the previous sections to assist y'all deepen your understanding of this app and keep sharpening your skills by thinking things through on your own. Do you accept any other improvements that could be made to this uploader? Leave some suggestions in the comments and if you implemented whatsoever of the suggestions from above, you can share your piece of work in the comments, too.
God bless and happy coding!
![]() (vf, yk, il)
(vf, yk, il)
Source: https://www.smashingmagazine.com/2022/03/drag-drop-file-uploader-vuejs-3/
Post a Comment for "File Upload File Type Restriction in Vue"